
Kids Popsicle Stick Stars and Stripes Flag Craft for 4th Of July
This post may contain affiliate links, including Amazon Associate links. As an Amazon Associate, I earn from qualifying purchases at no additional cost to you. Please see my Disclosure Policy for more details.

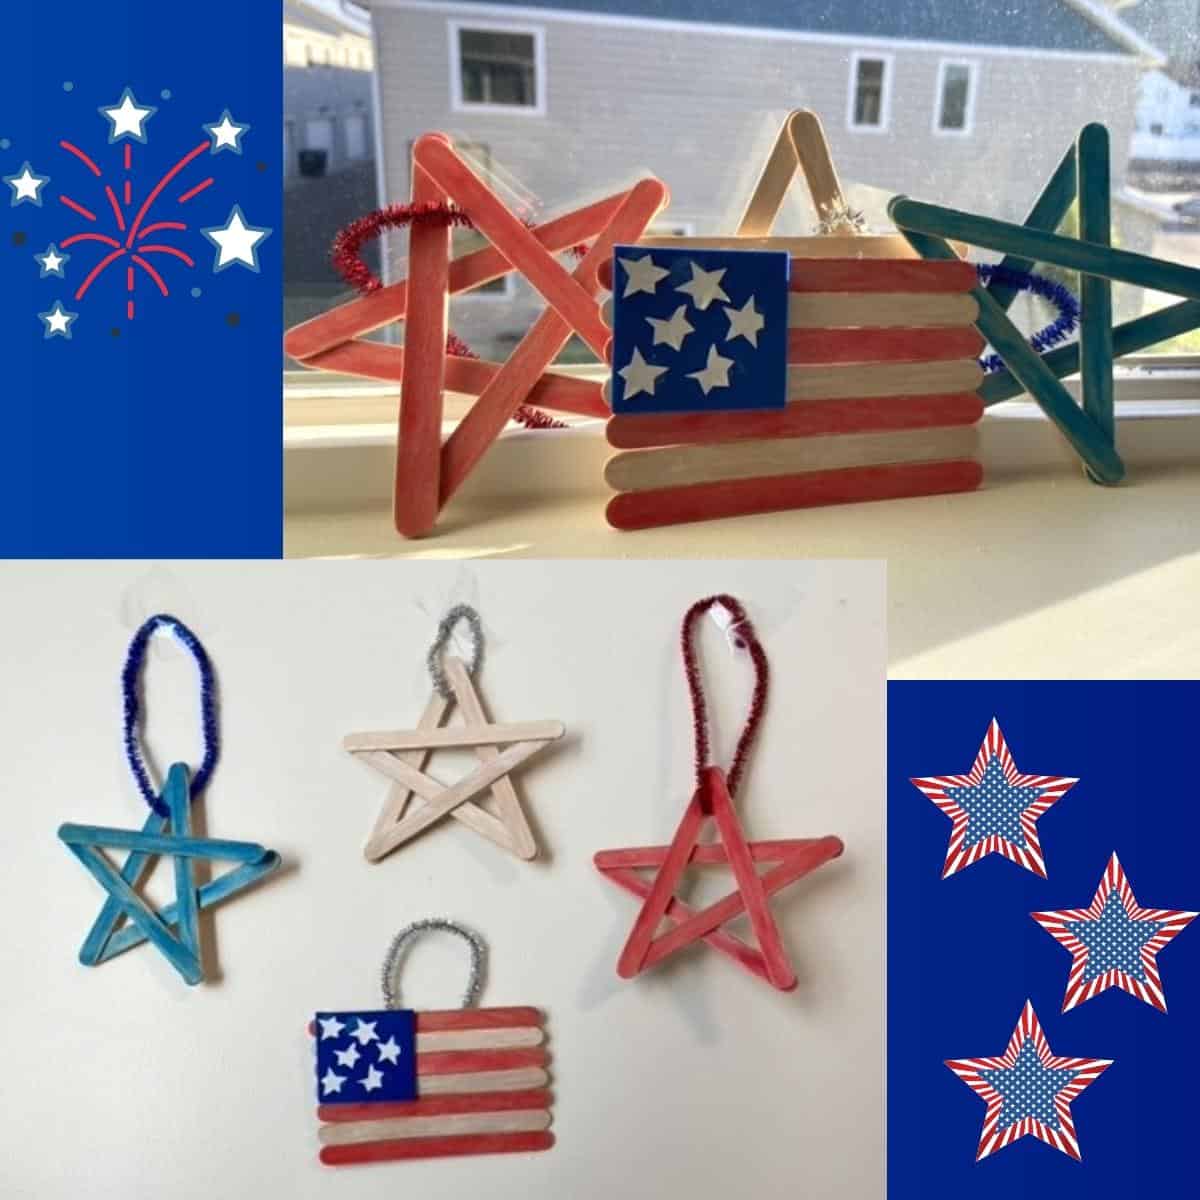
This easy craft for kids is perfect for decorating for the 4th of July. With popsicle sticks, some glue, and paint, your kids can make their own stars and flags!
The Patriotic Holiday’s are upon us, which means time to break out our red, white, blue, flags, Uncle Sam, fireworks and sparklers. Okay so we aren’t going to get that crazy with these fun Patriotic decorations for kids but these are the most adorable crafts that the whole family can enjoy making.

Before I made these 4th of July crafts with my son, I wanted to take a few minutes to teach him. We talked about what Patriotism is and how we can show love and respect to our country and the men and women who serve us every single day.
I found this as a great teaching moment and to be honest one that I should take more often than I probably do. Sometimes I find my self wondering if my child really knows why we celebrate things like Memorial Day, 4th of July, and Labor Day.
So taking a fun few minutes to teach him about the American Flag and that the 13 stripes represent the original 13 colonies and the 50 stars represent the states of the Union. As well as what each color symbolizes helps me feel like my child is still learning even during the summer. (And let’s be honest, it helps me refresh my learning as I don’t always have the greatest memory!)
How to make the popsicle stick flag craft
To start out with I made these decorations using regular sized popsicle sticks, however, you can use any size stick including pallets (for the flag) and longer boards for the stars. Just remember the heavier the piece of wood is the stronger glue or nails you will need.
Materials Needed For all 4 crafts:
- 22 Popsicle Sticks
- Red, White and Blue Paint
- Glue
- Scissors
- Half sheet of white Paper or Star stickers
- A 2 inch Blue Square out of paper or foam paper
- String or pipe cleaner
- And if you’d like glitter spray paint.
Creating the Patriotic Popsicle stick crafts
These fun Patriotic Stars and Flag are such an easy task and so esthetically pleasing.
Step 1: Organize popsicle sticks
To start out, lay your popsicle sticks into three groups. One group of five sticks, one group of 8 sticks and one group of 9 sticks.

Each group of sticks represents a different color. You can mix up the colors on the stars and either do them only two colors or one, but just know that you will need seven sticks alternating colors starting with red for the flag.
Step 2: Paint the popsicle sticks
I like to start by painting the red and white sticks first, so they can start drying. I only painted one side, because I am going to be hanging mine up in the house against a wall, but you are more than welcome to paint both sides. Just remember to allow the paint on one side to dry completely, before flipping over.

I painted 9 red sticks, 8 white sticks and 5 blue sticks.
Step 3: Cut paper for the blue square on the flag
Once I finished painting the sticks I set them aside and got out my blue paper. I cut it into a 1 1/2″ square for the flag.

Step 5: Cut out stars
Next, I traced out stars and cut them out. For the stars you can place as many or as little as you’d like. I also know that you can buy sticker stars that would make this step a lot easier.
After I got the square and the stars cut out, I glued the stars onto the square and spread them out in a design that I liked. I didn’t do all 50 stars, as I was cutting them out by hand and didn’t have enough room on my square. However, if you use larger popsicle sticks or other sticks you may have enough room to do this.

Step 6: Lay out stars
Next, I checked my sticks to see if they were dry. Once they finished drying I laid out my stars. Make sure to glue everywhere on the stars so they stay together. Then I laid out my flag. Be sure to start with a Red Stick which will allow you to end on a red and makes the flag come together.

I let the stars and stripes dry for about 10 Minutes. Then I assembled the blue corner of the flag. At this point you have done the majority of the craft!
Step 7: Attach hangers
Finally, I knew I wanted to hang mine up so I got some pipe cleaners, but you can use ribbon or string and looped it through one of the holes to hang it up. I did mine at all different lengths so that they would coordinate with each other.

Lastly, I glued a pipe cleaner to the back of the flag. Put a generous amount of glue and let it dry overnight.
In the end, you will have some beautiful decorations to place around your home, for the Fourth of July, Labor Day or Memorial Day helping us all to remember what our Freedom Stands For!
Don’t hesitate to make a few more of them to hang around the house as they all compliment each other and are pretty simple to make!
Variations for Older Kids
Another fun thing for adults or teenagers who have a little more ambition, are taking these stars and flags and turning it into something a bit more decorative and useful for each Patriotic season. This is a quick way to make a fun and decorative wreath for your front door!
Get a wire wreath and thread tulle and ribbon through out it. Get a variety of red white and blues. I like to add some bows and make it very full so that it stands out. Next, I would either wire the stars to the wreath or hot glue the stars all around.
With the flag I would make a few of them to place in the wreath to help balance it out. Finally, I would sprinkle it with glitter glue and let it fully dry before hanging it up.
You can either hang it up by the center or another cute way is by adding a ribbon to the top and hanging it up by that and placing some fun decorations of bows, flags, fake sparklers and characters in the middle.
