
Easy Oreo Ball Recipe – With Holiday Variations!
This post may contain affiliate links, including Amazon Associate links. As an Amazon Associate, I earn from qualifying purchases at no additional cost to you. Please see my Disclosure Policy for more details.


In this Oreo ball recipe, you will find easy step-by-step instructions for making and decorating a treat that is perfect year-round for holidays, parties, and celebrations!!
Jump to RecipeNOTE: See the bottom for Holiday variations! We have instructions for Halloween, Christmas, and more!

Looking for a dessert you can perfectly curate to any season or event with limited ingredients, prep, no oven and requiring minimal to no serving tools? Keep it classic or mix it up, kids and adults alike will undoubtedly love Oreo Balls and you’ll love how easy they are. All you need are Oreos, cream cheese, and chocolate!
I’ll walk you through how to make a classic, easy Oreo Ball as well as share some tips and variations.
What you need to make Oreo Balls
One thing that I LOVE about this Oreo ball recipe is its simplicity. While there are a few steps involved, the fact that it only needs 3 ingredients to make it is AMAZING! Plus my little guy can help in the kitchen, which makes it even better!
Ingredients
- 1 Package of Oreos
- 1 block (8 oz) Cream Cheese softened
- 3 cups Dark/White Chocolate (Chocolate chips, bark, or melts all work to varying degrees)

Kitchen Tools
Realistically, you could get away with having a blender, sheet pan, mixing bowl, and spoon for this! Even a college kid with limited kitchen supplies could pull it off. But, for the overachievers out there who want to decorate their treats to the fullest (hehe that’s me), here are the tools you will want for this Oreo ball recipe.
- Food Processor or Blender – My processor broke ages ago, but my Ninja blender does the job beautifully! I have this one.
- Rubber Spatula
- Cookie Scoop or Spoon – I used a 1.5 inch scoop that’s an absolute staple in my kitchen!
- Cookie Sheet
- Parchment Paper
- Bowls (2-3)
- Spoons (2-3)
- Butter Knife
- Baggies (2-3) For any chocolate drizzles, I used snack size.
- Paring Knife Not necessary if you’re a candy dipping pro – I’m not and I won’t lie about it.
Optional Toppings
This Oreo ball recipe is one you will want to keep around because you can use it for literally ANY holiday, party, or celebration.
Stay tuned, because I have included some ways to decorate this original Oreo ball recipe for various holidays such as a mummy for Halloween, a pumpkin for Fall, and a peppermint paradise for Christmas.
No matter what occasion you are making Oreo balls for, here are some add-ins and toppings you can use to make them your own!
- Flavored Extracts – Peppermint, almond, pumpkin spice, etc.
- Crushed Oreos
- Seasonal Sprinkles
- Candy Eyes
- Andes Peppermints
- Edible Glitter
- Caramels
- Candy Melts
- Gel Food Coloring

How to make Oreo Balls
In less than 10 steps, you can have these delicious Oreo balls to eat and share with others!!
So, let’s hop right into it.
- First, get out your ingredients! – Grab your Oreos, cream cheese, chocolate, and toppings. You can either use the whole package of Oreos or grab a few out to save for decorating later! (Hint: there are 15 Oreos in one line of a Family Size pack.)
- Blend Oreos into a fine powder – Add to your processor/blender and blend until very fine. If you don’t have a blender – double bag your Oreos in freezer bags. Take a rolling pin and get to work! I like the smash-shake-smash method.
- Mix in Cream Cheese until fully combined – (and optional 1/2 tsp flavored extract) and blend until fully incorporated, scraping down as necessary. You can use your hands or even have your kids mix it together with their hands. (I recommend having them wash their hands first haha).
- Prepare a cookie sheet lined with parchment paper – Makes for easy transportation and clean up.
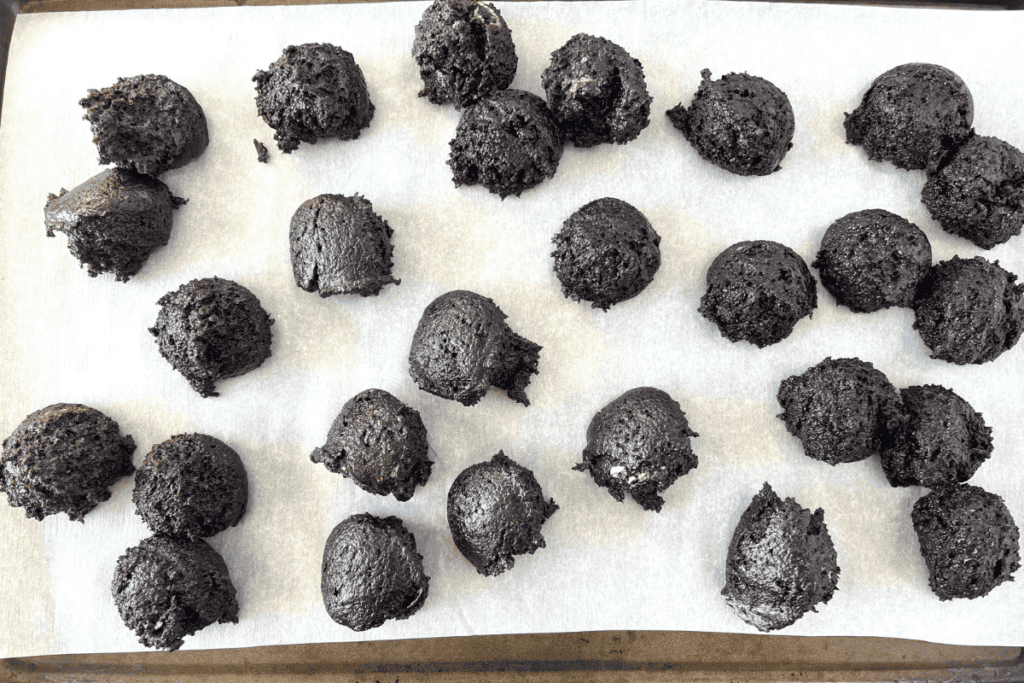
- Roll Oreo balls + cool them – Roll your mixture into balls and refrigerate for 15-20 minutes or freeze for 10 minutes. Tip: Run your hands under cold water before rolling. This can help prevent sticking. It can also make them look a lot smoother than the picture below.
- Melt the chocolate – With about 3-5 minutes left on your timer, prepare your first chocolate by melting about 1 cup of chocolate in the microwave in 30-second intervals. (See Notes regarding some chocolate tips!) A double boiler could also be used!
- Take your Oreo Balls out of the fridge/freezer – Remove about ¼ of your Oreo Balls from the fridge/freezer, you’ll be working one by one and don’t want them to warm up too much. If they were in the freezer and you plan on using candy melts, move the remaining to the fridge now.
- Coat Oreo Balls in Melted Chocolate – Begin coating your Oreo Balls by taking your butter knife in your non-dominant hand and scooping just a tiny bit of chocolate onto the end. Gently plop your Oreo ball down onto that chocolate. Keeping your knife nice and level, spoon a generous amount (one big spoonful to start) over top of your Oreo Ball. Most of the chocolate will smoothly fall down the sides. Fill in any gaps by spooning chocolate onto the gaps, rather than again over top. If it falls in, simply scoop it out and plop it back onto your knife so the excess chocolate has a chance to drip down!

- Transfer the coated Oreo Ball to dry – Once the Oreo ball has been covered in melted chocolate, use the back of your spoon and gently push your chocolate-coated creation back onto the parchment paper.
OPTIONAL:
- Decorate the Oreo Ball! – Top with any crushed Oreos, sprinkles, etc. immediately before it sets and will bounce right off! If you want to add a chocolate drizzle, allow 10-15 minutes for the Oreo balls to chill and set in the fridge.
- Prepare your drizzle chocolate – If drizzling, prepare your opposite color in the microwave and spoon into a baggie. Snip the bottom tip of the bag just barely. Ideally with your Oreo Ball on another plate/surface, apply pressure to your baggie, and with a back-and-forth motion apply drizzle. Move quickly! Slow and calculated may result in a clumsy appearance.
- Cool the Oreo balls – Set in the freezer for about 10 minutes. Yup, the freezer, because if you’re still with me and trusting the process, it’s time to finish them by cleaning them up a bit.
- Clean up the edges/bottoms – To get rid of the ugly bottom edge and excess chocolate – When slightly frozen, you can simply snap off much of the excess chocolate. What you can’t snap off, cut off! Boil some water or run your sink as hot as it can go and fill a mug. Dip your paring knife in the hot water for a few seconds and wipe dry with a towel. Moving quickly, cut away the excess chocolate. The hot knife helps with a clean edge! Move in a clockwise motion and remember to clean your knife with a damp paper towel between colors of chocolate!

How to Store your Oreo Balls
Since this Oreo ball recipe makes 27-30 treats, it is a recipe that is perfect for parties and gatherings. Let me tell ya, they get gobbled UP at every event I have brought them to.
However, they are also a great activity to do with the kids or for you to enjoy some me time.
In the event that you have Oreo balls you want to save, here are the best ways to store them.
If they will be eaten in the next week, store them in an airtight container in the fridge. And if you want to store them for longer than that, you can put them in an airtight container in the freezer for up to 3 months! Simply allow them to thaw before serving, and you are good to go!
Holiday and Flavor Variations
Classic Oreo Balls: Coat with a white or dark chocolate base with an opposite color drizzle or
crushed Oreo topping.
Valentine’s Oreo Balls: Simply drizzle with pink candy melts/colored white chocolate or sprinkle
your favorite Valentines sprinkles!
Pumpkin Oreo Balls: Prepare a stem by molding a warmed piece of caramel. You won’t need
much! Set it aside. Create your pumpkin ridges on a chilled Oreo ball prior to coating by using a
sucker stick, back of a fork, etc. Make sure to exaggerate the lines as they get lost in coating!
Melt white chocolate and color with orange gel color. Coat your Oreo Ball pumpkin and
immediately apply stem. Set.
Halloween Oreo Balls: Coat with a white base with candy eyes added immediately then set prior
to adding a white drizzle – first above the eyes, then below, then at a diagonal on either side.
Alternately, add Halloween sprinkles immediately after coating.
Christmas Oreo Balls: I love adding peppermint extract to mine! Coat in chocolate, white or dark,
and top with crushed peppermint pieces or Andes peppermints.
Flavor Variations: Use Golden Oreos, Mint, etc. As long as they’re not Double Stuff!
Dairy-Free: Swap the cream cheese for any nut butter of your preference.
Looking for other holiday recipes and activities? Check out our page here!


Easy Oreo Balls Recipe
Equipment
- 1 Food Processor or Blender
- 1 Rubber Spatula
- 1-2 Cookie Scoop or Spoon
- 1 Cookie Sheet
- 1 Sheet of Parchment Paper
- 2-3 Bowls
- 1 Butter Knife
- 1-2 Baggies if you want to drizzle chocolate on top
- 1 Pairing Knife an option to help with dipping the Oreo balls in chocolate
Ingredients
- 1 pack Original Oreos 36 for making the balls and 4 for decorating
- 1 block 8 oz Cream Cheese softened
- 3 cups Dark/White Chocolate Chocolate chips, bark, or melts all work to varying degrees.
Instructions
- First, get out your ingredients! – Grab your Oreos, cream cheese, chocolate, and toppings. You can either use the whole package of Oreos or grab a few out to save for decorating later! (Hint: there are 15 Oreos in one line of a Family Size pack.)
- Blend Oreos into a fine powder – Add to your processor/blender and blend until very fine. If you don’t have a blender – double bag your Oreos in freezer bags. Take a rolling pin and get to work! I like the smash-shake-smash method.
- Mix in Cream Cheese until fully combined – (and optional 1/2 tsp flavored extract) and blend until fully incorporated, scraping down as necessary. You can use your hands or even have your kids mix it together with their hands. (I recommend having them wash their hands first haha).
- Prepare a cookie sheet lined with parchment paper – Makes for easy transportation and clean up.
- Roll Oreo balls + cool them – Roll your mixture into balls and refrigerate for 15-20 minutes or freeze for 10 minutes. Tip: Run your hands under cold water before rolling. This can help prevent sticking. It can also make them look a lot smoother than the picture below.
- Melt the chocolate – With about 3-5 minutes left on your timer, prepare your first chocolate by melting about 1 cup of chocolate in the microwave in 30-second intervals. (See Notes regarding some chocolate tips!) A double boiler could also be used!
- Take your Oreo Balls out of the fridge/freezer – Remove about ¼ of your Oreo Balls from the fridge/freezer, you’ll be working one by one and don’t want them to warm up too much. If they were in the freezer and you plan on using candy melts, move the remaining to the fridge now.
- Coat Oreo Balls in Melted Chocolate – Begin coating your Oreo Balls by taking your butter knife in your non-dominant hand and scooping just a tiny bit of chocolate onto the end. Gently plop your Oreo ball down onto that chocolate. Keeping your knife nice and level, spoon a generous amount (one big spoonful to start) over top of your Oreo Ball. Most of the chocolate will smoothly fall down the sides. Fill in any gaps by spooning chocolate onto the gaps, rather than again over top. If it falls in, simply scoop it out and plop it back onto your knife so the excess chocolate has a chance to drip down!
- Transfer the coated Oreo Ball to dry – Once the Oreo ball has been covered in melted chocolate, use the back of your spoon and gently push your chocolate-coated creation back onto the parchment paper.
Decorating
- Decorate the Oreo Ball! – Top with any crushed Oreos, sprinkles, etc. immediately before it sets and will bounce right off! If you want to add a chocolate drizzle, allow 10-15 minutes for the Oreo balls to chill and set in the fridge.
- Prepare your drizzle chocolate – If drizzling, prepare your opposite color in the microwave and spoon into a baggie. Snip the bottom tip of the bag just barely. Ideally with your Oreo Ball on another plate/surface, apply pressure to your baggie, and with a back-and-forth motion apply drizzle. Move quickly! Slow and calculated may result in a clumsy appearance.
- Cool the Oreo balls – Set in the freezer for about 10 minutes. Yup, the freezer, because if you’re still with me and trusting the process, it’s time to finish them by cleaning them up a bit.
- Clean up the edges/bottoms – To get rid of the ugly bottom edge and excess chocolate – When slightly frozen, you can simply snap off much of the excess chocolate. What you can’t snap off, cut off! Boil some water or run your sink as hot as it can go and fill a mug. Dip your paring knife in the hot water for a few seconds and wipe dry with a towel. Moving quickly, cut away the excess chocolate. The hot knife helps with a clean edge! Move in a clockwise motion and remember to clean your knife with a damp paper towel between colors of chocolate!
Notes
- This is a recipe that can be made gluten-free!! Oreo makes a cookie that doesn’t contain any gluten in it.
- Run your hands under cold water before rolling the Oreo ball mixture. This can help prevent sticking.
- Make sure to heat the chocolate in 30-second intervals and then mix. Otherwise, it can totally burn the chocolate and make it unusable. (for coating the Oreo balls)
- Use an airtight container and either store in the fridge for up to a week or the freezer for up to 3 months.
Don’t Go Just Yet
Here at Events to Celebrate, my whole goal is to help real people plan for their kids’ birthday parties, life events, and holidays! Life is crazy. I GET IT. You don’t have endless time OR money to spend on parties, but you still want to help your guests have a great time. I’m here to help give you tips, tricks, and ideas for celebrating life on a budget.
As a mom, you want to do it all. You want to make your family happy and create special memories. My brand is all about creating special moments with those you love. The kind of moments that you will look back on years later and wish you could relive! So, if that’s something you’re interested in, stick around! I have an email list you can sign up for, so you don’t miss my future party ideas!
