The Best Gorgeous & Easy Thanksgiving Cookies
This post may contain affiliate links, including Amazon Associate links. As an Amazon Associate, I earn from qualifying purchases at no additional cost to you. Please see my Disclosure Policy for more details.
Jump to Recipe
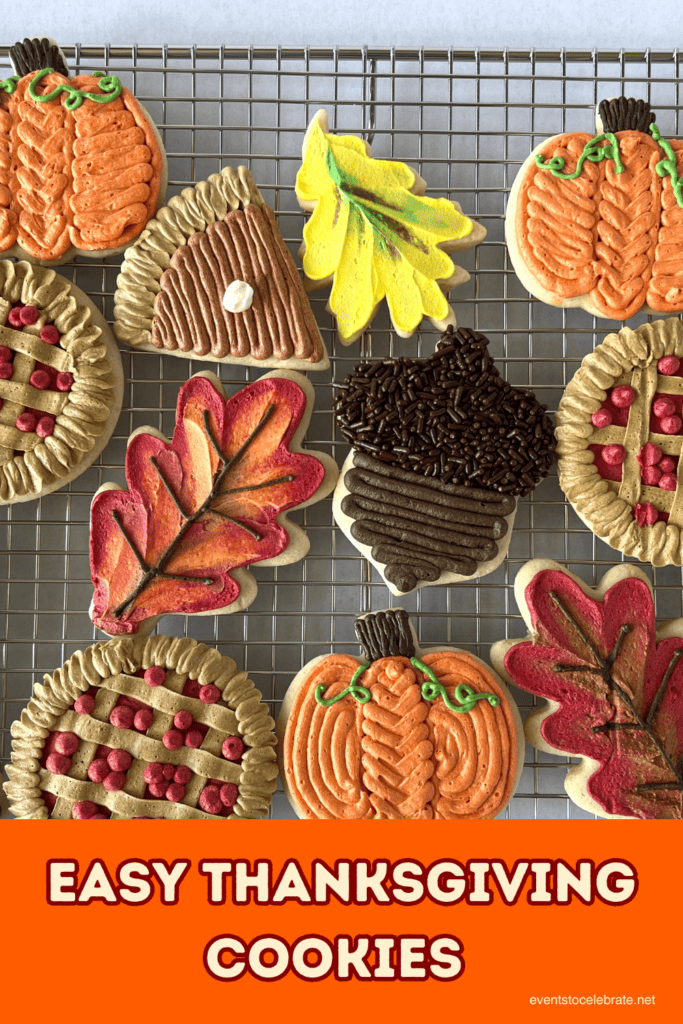
With our easy step-by-step instructions and photos, you CAN make these show-stopping Thanksgiving cookies. Everyone will be impressed and begging you to bake more!!
Don’t worry if you are an amateur baker! I have clearly laid out all the steps to making these easy thanksgiving cookies because a lack of practice shouldn’t keep you from making something you can be proud of!
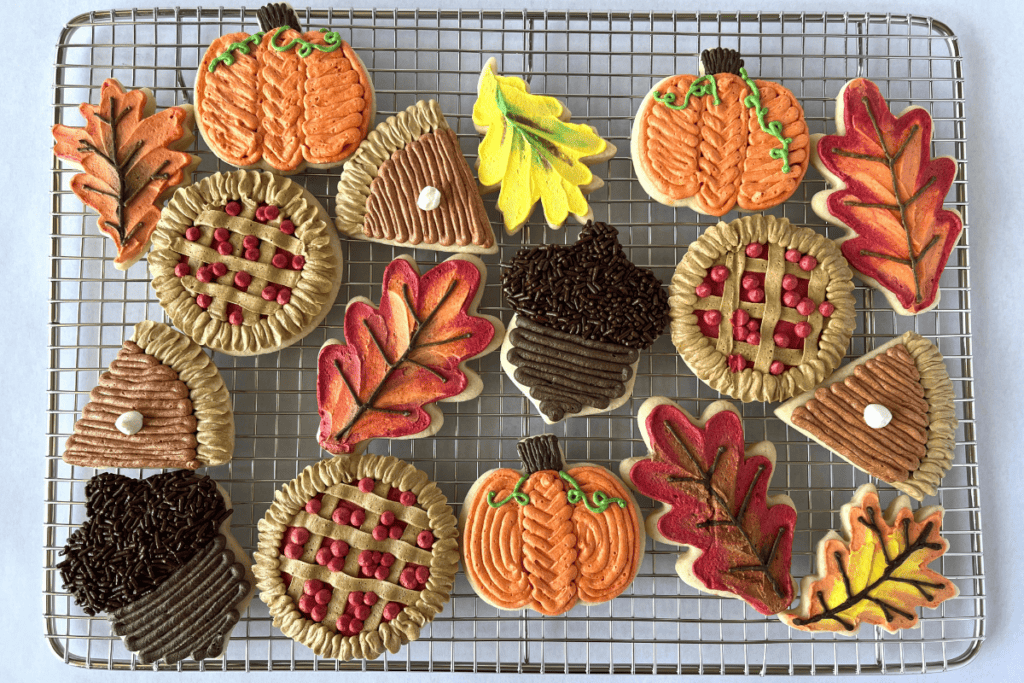
Here’s the truth someone out there needs to hear: You don’t have to make pie for every Thanksgiving holiday season! What?! Hear me out! You can definitely make pie if your family loves pie; you know your family best after all. But if I may, I would like to propose another option (instead of or in addition to, you do you!): these easy Thanksgiving cookies are PERFECT for when your oven is overloaded, certain family members don’t like pie, or maybe you just want to switch it up.
They’re easy, have a classic flavor, can be prepped ahead of time, and will add an adorable uniqueness to your spread. You and your family are going to love these gorgeous homemade cookies, using this easy recipe!
Tools Needed
If you’re just getting started, I’ll mention some favorite products as well that won’t break the bank!
For cookies…
- Stand Mixer: I have this stand mixer, but my daughters have this one and theirs is definitely more powerful!
- Parchment Paper
- Rolling pin (or alternative such as a wine bottle or smooth drinking glass)
- Baking Sheets (2)
- Ruler
- Cookie Cutters Pick one, pick all six, it’s up to you! Amazon has some super cute ones if you don’t have anything locally!
- Scissors
For buttercream and decorating…
- Gel food colors (emphasis on GEL) I used Wilton Color Right!
- Piping bags (minimum of three (3) or one for every color) I use Weetiee from Amazon.
- Couplers
- Round tips, small but varying in size (2-3) Wilton or Ateco are my faves, can be purchased at Walmart, Michaels, etc. – Simply cutting a plastic baggie will backfire and burst. Trust me
- Petal tip
- Offset spatula (can get away with a regular kitchen knife) Ateco is the hill I’ll die on! And inexpensive!
- Rubber Spatula
- Small bowls
- Spoons
- Plastic Wrap
- Chocolate sprinkles (aka jimmies) Walmart has these in their regular baking aisle!
Making these GORGEOUS Thanksgiving Sugar Cookies
Note: This Thanksgiving sugar cookies recipe yields 24 cookies!
If you’re looking for cut-out cookies that don’t turn every cut-out into a blob, this recipe is it! The best part: all simple ingredients you probably have in your pantry and refrigerator right now!
Ingredients:
- 1 cup unsalted butter, cold can sub plant butter
- 1 cup granulated sugar
- 2 large eggs, room temperature
- 2 tsp vanilla extract
- 3-4 cups all-purpose flour
- ½ cup cornstarch (do not omit or use corn flour)
- ½ tsp salt

Baking Instructions:
- Preheat your oven to 375 degrees.
- In a stand mixer beat your butter on MED-HI for 1-2 minutes using the paddle attachment,
scraping down as necessary. - Add your sugar and cream on MED until light and fluffy. Tip: You should no longer feel the large
granules of sugar between your fingers, they’ll be very small and delicate, and the color should
go from a buttery yellow to almost white. - Mix your eggs one at a time until combined. This prevents streaks of whites in your cookies.
- Add in vanilla, mix.
- To a seperate mixing bowl, add in three cups of flour, your cornstarch, and salt. Whisk until combined.
- Add your flour mixture slowly and mix on LOW-MED until it goes from crumbly to a cohesive lump
that pulls away from the sides of the bowl a little bit. - If needed, add more flour! About ¼ cup at a time. (It’s likely you will.) Consistency should be
firmer than chocolate chip cookie dough so it’s workable but soft enough to avoid a hard cookie.
If you pick up the top of your stand mixer, your dough should stick to the paddle without
drooping or falling off. In addition, pulling dough away should pull away, not break away. - Between two pieces of parchment paper, roll out your dough to ¼ inch. I always use a ruler. Cut
into shapes and freeze on your baking sheet for about 7-8 minutes or refrigerate for 15 minutes.
Repeat. (SEE TIPS) - Bake for 8-10 minutes. Check on them after 8 minutes. Look for a set top, which will still be pale but won’t be shiny. You do NOT want brown edges! The bottom should only be thinking about
browning. You want these to come out on the edge of “underdone.” - Pull the entire sheet contents off by lifting the parchment from two corners at a diagonal and
placing on a cooling rack/counter. Allow to cool completely on the counter before frosting.

Cut-Out Cookies Baking Tips:
Cold butter – The mixer will beat this just fine, so help keep your dough chill by starting cold.
Room temperature eggs – Put your eggs in a bowl of hot water and let them sit for one minute.
Dairy Free Substitution – If looking for a dairy free option, you can sub dairy free butter in this recipe. Country Crock is what’s been tested here and produces a beautiful, soft cookie. (Making this vegan – examining recipes it almost seems as if you could simply omit the egg entirely, however, I haven’t tried it as eggs are a binding agent, provide moisture, and… I’m scared of crumbly dry cookies.)
Rolling/Cutting Cookies – Nothing gives me more grief than moving cut cookies. Unless there’s too much flour, it’s awful. To avoid the headache, I begin by cutting my parchment down closer to the size of my cookie sheet. I then roll a smaller portion of dough between those and use my cookie cutters exactly where I want to bake my cookies! They’ll be properly spaced and all I have to do is remove the scraps! No searching for the perfect spatula, tossing cookies from sheet to sheet, or fixing!

Making the Buttercream
Prep your buttercream while your cookies bake.
Ingredients:
- 2 cups unsalted butter, cold can sub plant butter
- 6 cups powdered sugar
- ¼ cup heavy cream can sub plant based cream
- 2 tsp vanilla extract
- Pinch of salt (about 1/8 tsp)
- Cocoa (for coloring later on)

Instructions:
- In a stand mixer with the paddle attachment beat butter on MED-HI for 2-3 minutes. Scrape
- down.
- Add powdered sugar on LOW-MED one cup at a time (trust me) and mix until combined.
- Add in your heavy cream, vanilla, and salt. Beat 3-5 minutes on MED-HI. You’ll notice a color and
texture change! It will become more white and much lighter and smoother. - For a smoother texture with fewer air bubbles, use a wooden spoon and mix back and forth
about five minutes to knock out any air bubbles; just remember you’re not trying to mix in any
more air!

Coloring the Frosting and Assembly
Coloring Buttercream:
Don’t let this scare you! Buttercream cookies are so much easier to handle than royal icing, and this
method has been tested by even individuals that “absolutely cannot do that.” You can totally do it!
- Take a minute to consider how many of each shape you have and what colors you need! For
- example, I realized after baking I only made two acorns!!
- Divide your buttercream into several small bowls but keep a large (I’d say half batch at least)
white reserve! I’d say about half a cup each to start for the colors you’ll need more of. - Using your gel colors, mix your frosting. Start with just a little gel – it’s easier to add more than
remove. Any colors that aren’t just red or orange…
Pie orange: Orange w/ a hint of brown and yellow
Crust color: A couple of drops of brown with a tiny half drop of yellow (add sparingly)
Dark brown: A tablespoon or two of cocoa with brown gel to supplement
Green: Use blue sparingly, it goes a long way
Assembly:
You’ll notice above I only mentioned three bags, but you’ll likely want more colors! I know, the math
ain’t mathin’! If you don’t have a bag for every color, you’re going to add couplers to just three of your
bags and add tips. I advise the petal tip and two round tips. Do not fill these directly with buttercream.
Instead, you’re going to prep your colors by doing the following:
- Take a piece of plastic wrap and lay it out. Plop your colored buttercream down, just a little
- blob. Now roll it up like a hard candy wrapper and you’ll have a buttercream log.
- Using scissors, snip one end of your log.
- Cut side down, place this into the piping bag all the way to the bottom!
- Twist the top once or twice, apply pressure, and pipe away.
- To switch colors, remove your buttercream, replace it with another log, and remember to
squeeze out the rest of the old color onto a plate/paper towel before using.

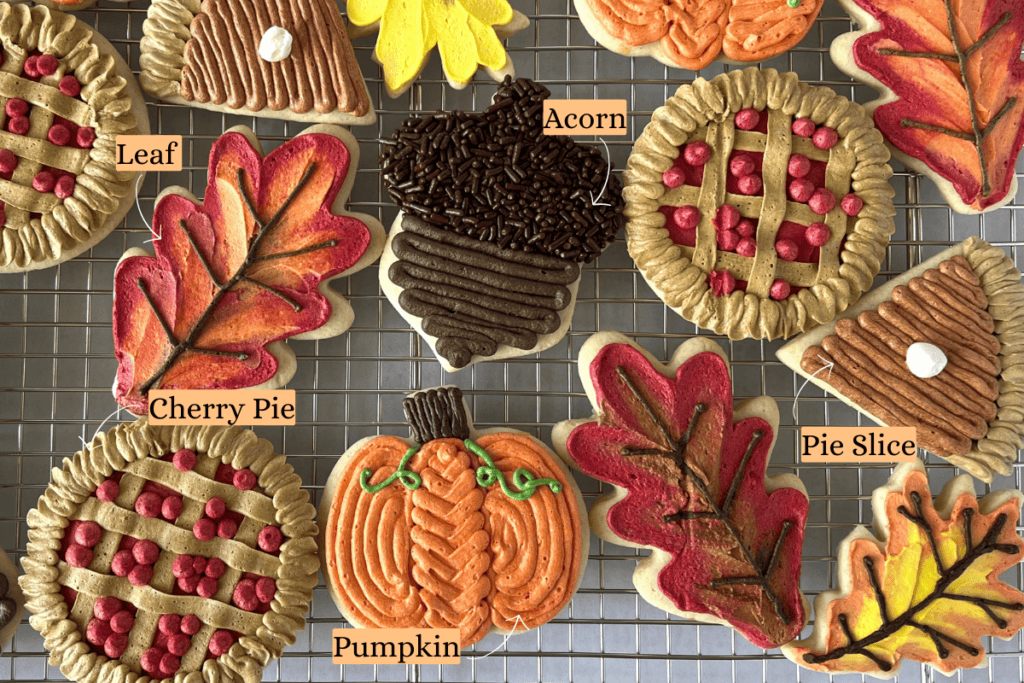
A Little Walk-Through Of Each Thanksgiving Cookie:
Pumpkin Pie Slices:
- Start with your petal edge and with the wider side up (preference) frost along the top edge in a little “m” motion. TIP: Go to the outer edge of the cookie but not over so it’s easier to move them. Switch to your orange-ish buttercream with a round tip and pipe diagonal lines back and forth.
Cherry Pies:
- Using your offset spatula, apply a thin layer of red across the top. Then take your crust color with the petal tip and make three lines, rotate 90 degrees, and three more lines making sure there’s still red visible. Next, pipe your outer crust using that same “m” motion and using your non-dominant hand to help you rotate the cookie. Finally, using your red with a round tip, pipe little cherries on top.
Acorns:
- Using the line method, frost your acorn top. Immediately apply sprinkles by flipping the cookie into the sprinkles and applying a bit of pressure. Flip back over and frost the bottom.
Pumpkins:
- Start with orange and frost from the middle out. Trace your middle section and fill either with diagonal lines or a “v” motion back and forth as you move down. Trace your outer sections and fill, then the top. Finally, apply your vines! Anything goes here and asymmetry is your friend.
Leaves:
- Starting with the color you want to see most of, trace (twice, moving from the outside in) the
shape of your leaf. Fill with your secondary color. Using your offset spatula, gently drag from the outside of each point into the center line at a diagonal. I liked going back and forth from side to side. Top, left, right, repeat. Once your colors are blended, pipe veins on top with your smallest tip.
How to Store these Thanksgiving Cookies
Store your Thanksgiving cookies in an airtight food storage container in the refrigerator, providing there are any left! Buttercream contains cream, so this method will help preserve your delicious cookies for the longest amount of time.
To avoid crushing your work…
Let the cookies rest a couple hours to crust (they get slightly hard on the outside). Once they do, take
your cookies and place into a single layer in a large container with a lid. I like to start with the most flat, simple cookies in the batch. Cover with a layer of wax paper/parchment and repeat. Place the lid and store for a week! Just make sure to find them a home on a shelf furthest away from any particularly pungent items.
How to freeze these Thanksgiving cookies (up to a couple of months): Freeze in a single layer on cookie sheets before storing as above. To thaw before eating, move to the refrigerator the night before you need them, then onto the counter a couple of hours before serving (unstack them!!). This will help avoid condensation.
Check out these Pumpkin Chocolate Chip Cookies if you would like another easy recipe for this Thanksgiving holiday season!
Final Thoughts
Whether you’re planning to bake cookies for your Thanksgiving dessert table, fill up Thanksgiving gift baskets, or simply enjoy some sweet treats with your family, these homemade and gorgeous Thanksgiving cookies are the perfect addition to your holiday traditions. Skip the grocery store bakery this year and try a few of my favorite Thanksgiving cookies made with love right at home. From beautiful fall colors to classic flavors, this simple recipe is a festive way to bring warmth and fun to this special time of year. Add them alongside your favorite pies or let them steal the spotlight on your dessert spread—they’re sure to become one of your favorite Thanksgiving cookie recipes! There’s no better way to end Thanksgiving dinner than with the best cookies around. Wishing you a happy Thanksgiving filled with food, family, and much fun!
Activities to Go Along With Your Thanksgiving Cookies
- Thanksgiving Family Games
- Thanksgiving Bingo Free Printable
- 9 Thanksgiving Crafts for Kids
- Thanksgiving Activities for Kids
- 60+ Thanksgiving Desserts That Aren’t Pie

Easy Thanksgiving Cookies
Equipment
- 1 Stand Mixer
- 1 Parchment Paper Roll
- 1 Rolling Pin
- 2 Baking Sheets
- 1 Ruler
- 1 Set of Cookie Cutters
- 1 Pair of Scissors
- 1 Set of Gel Food Color
- 3+ Piping bags
- Couplers
- 2-3 Round TIps
- 1 Petal Tip
- 1 Offset Spatula
- 1 Rubber Spatula
- 2-3 Small Bowls
- 1 Spoon
- 1 Roll of Plastic Wrap
- 1 Jar of Chocolate Sprinkles
Ingredients
Cookie Ingredients
- 1 cup unsalted butter, cold can sub plant butter
- 1 cup granulated sugar
- 2 large eggs room temperature
- 2 tsp vanilla extract
- 3-4 cups all-purpose flour
- 1/2 cup cornstarch do not omit or use corn flour
- 1/2 tsp salt
Buttercream Ingredients
- 2 cups unslated butter, cold can sub plant butter
- 6 cups powdered sugar
- 1/4 cup heavy cream can sub plant-based cream
- 2 tsp vanilla extract
- 1 pinch salt about 1/8 tsp
- cocoa for coloring later on
Instructions
Cookie Baking
- Preheat your oven to 375 degrees.
- In a stand mixer beat your butter on MED-HI for 1-2 minutes using the paddle attachment, scraping down as necessary.
- Add your sugar and cream on MED until light and fluffy. Tip: You should no longer feel the large granules of sugar between your fingers.
- Mix your eggs one at a time until combined. This prevents streaks of whites remaining.
- Add in vanilla, and mix.
- To a mixing bowl, add three (3) cups of flour, cornstarch, and salt. Whisk until combined.
- Add your flour mixer slowly and mix on LOW-MED until it goes from crumbly to a cohesive lump that pulls away from the sides of the bowl a little bit.
- If needed, add more flour! About ¼ cup at a time. (It’s likely you will.) Consistency should be firmer than chocolate chip cookie dough so it’s workable but soft enough to avoid a hard cookie.
- If you pick up the top of your stand mixer, your dough should stick to the paddle without drooping or falling off and pulling dough away should pull away, not break away.
- Between two pieces of parchment paper, roll out your dough to ¼ inch. I always use a ruler. Cut into shapes and freeze on your baking sheet for about 7-8 minutes or refrigerate for 15 minutes. Repeat. (SEE TIPS)
- Bake for 8-10 minutes. You’re looking for a set top, which will still be pale but won’t be shiny. You do NOT want brown edges! The bottom should only be thinking about browning. You want these to come out almost “underdone.”
- Pull the entire sheet contents off by lifting the parchment from two corners at a diagonal and placing on a cooling rack/counter. Allow to cool completely on the counter before frosting.
Buttercream Frosting
- In a stand mixer with the paddle attachment beat butter on MED-HI for 2-3 minutes. Scrape down.
- Add powdered sugar on LOW-MED one cup at a time (trust me) and mix until combined.
- Add in your heavy cream, vanilla, and salt. Beat 3-5 minutes on MED-HI. You’ll notice a color and texture change! It will become whiter and much lighter and smoother.
- For a smoother texture with fewer air bubbles, use a wooden spoon and mix back and forth about five minutes to knock out any air bubbles; just remember you’re not trying to mix in any more air!
Coloring the Frosting
- Take a minute to consider how many of each shape you have and what colors you need! For example, I realized after baking I only made two acorns!!
- Divide your buttercream into several small bowls but keep a large (I’d say half batch at least) white reserve! I’d say about half a cup each to start for the colors you’ll need more of.
- Using your gel colors, mix your frosting. Start with just a little gel – it’s easier to add more than remove.
- See notes for instructions about how to create each color.
Cookie Decorating/Assembly
- Take a piece of plastic wrap and lay it out. Plop your colored buttercream down, just a little blob. Now roll it up like a hard candy wrapper and you’ll have a buttercream log.
- Using scissors, snip one end of your log.
- Cut side down, place this into the piping bag all the way to the bottom!
- Twist the top once or twice, apply pressure, and pipe away.
- To switch colors, remove your buttercream, replace it with another log, and remember to squeeze out the rest of the old color onto a plate/paper towel before using.
Notes