
Valentine’s Day Oreo Pops
This post may contain affiliate links, including Amazon Associate links. As an Amazon Associate, I earn from qualifying purchases at no additional cost to you. Please see my Disclosure Policy for more details.

With velvety smooth melted chocolate and sugary sprinkles, these Valentine’s Day Oreo pops are the perfect treat to share with your special someone.
Jump to RecipeThis recipe is proof that you can have trendy, cute treats for Valentine’s Day without breaking the bank or being a pro baker/chef!! In fact, I dare say that these Valentine’s Day Oreo pops are a no-fail dessert. With only 4 ingredients and basic decorating skills, you can take these well-beloved cookies and elevate them for the holidays.
So, don’t stress if you are new to the kitchen. My simple instructions, pictures, and tips will have you falling in love with this recipe. So, let’s help you create something impressive, tasty, and indulgent!
What You Need For These Valentine’s Day Oreo Pops
Here’s my opinion: The BEST desserts are both simple AND delicious. Thankfully, Oreo pops fall right into that category.
Since there is no baking or measuring involved, they are the kind of treat you can throw together while hanging out with friends, watching your favorite show, listening to a podcast, or even getting help from your kiddos. What’s not to love?!
I said it before and I will say it again, these Valentine’s Day Oreo pops only need 4 ingredients! Talk about a dream come true! So if you haven’t already, run to the store and get the items below. You will want to make these pops for yourself, your kids, the special someone in your life, and anyone else!

Ingredients:
- Oreo Cookies
- Baker’s Chocolate
- Food Coloring
- Sprinkles
Kitchen Tools/Appliances:
- Popsicle sticks
- 2-3 Small bowls
- 1 Spoon
- 1 Cookie Sheet
- Parchment Paper
- Microwave
These Oreo pops are so dreamy that I promise you will want to make them again and again!
Valentine’s Day Oreo Pop Tips
- Use Double Stuffed Oreos – While you can use Original Oreos, I suggest the Double Stuffed ones. The added frosting in the middle just helps them stay together a little better while dipping them in the melted chocolate. Plus you get more Oreo!
- Don’t overheat your chocolate! – If you overheat your chocolate it will clump up and become unusable! So take it slow rather than rushing and having to scrap it all!
- Use parchment paper underneath your Oreo pops for quick and easy clean-up!
- Good drizzling chocolate – Sometimes the chocolate is just a little too thick to make a cute drizzle. To fix this, add just a tsp or less of warm water to your freshly warmed chocolate. Mix it together for a more silky drizzling texture.
- Make extra! – Sometimes the Oreos can crack and break while you are handling them. Have a few extra on hand just in case. But also, make more Oreo pops than you think you want. Why? Because who can stop at eating just one Oreo. I mean really. Let’s be honest with ourselves.
How to Make these Oreo Pops
~Step One: Put your Oreos on sticks
Grap your parchment paper and add a layer to a large baking sheet. This will help make your clean-up process a lot easier and faster!
Once your parchment is laid down, you can add your Oreo pops on top. Carefully insert a popsicle stick or baking treat stick into each Oreo. With a 9×13 pan, you could comfortably fit 6-10 Oreo pops.

~ Step 2: Prepare your dipping chocolate
Next, use a small bowl and microwave to melt the baker’s chocolate. Follow the instructions listed on the chocolate packaging for proper warming.
Many brands suggest that you warm the chocolate up in 30 second increments, stiring each time. This will help prevent the chocolate from overheating. When chocolate overheats, it becomes hard and unusable. With this step, patience is key!
Pro tip: I find that it works best to do one color of chocolate at a time. I suggest warming the white chocolate, coating a few Oreos, and then warming more to make the pink coating. When you melt all the chocolate at once, it can be hard to work fast enough to finish coating all the Oreos before the melted chocolate cools down and starts to harden.
To create the light pink I added in half of a drop of red food coloring and a full drop for the darker pink color.
~ Step 3: Cover Oreos in melted chocolate
Once your chocolate has been melted (and colored if desired), carefully use a spoon to coat the entire outside of the Oreo. You don’t want any of the cookie peeking through!
Hold the Oreo pop over the bowl for a second, allowing any excess chocolate to run off. This will give your pops a cleaner look.
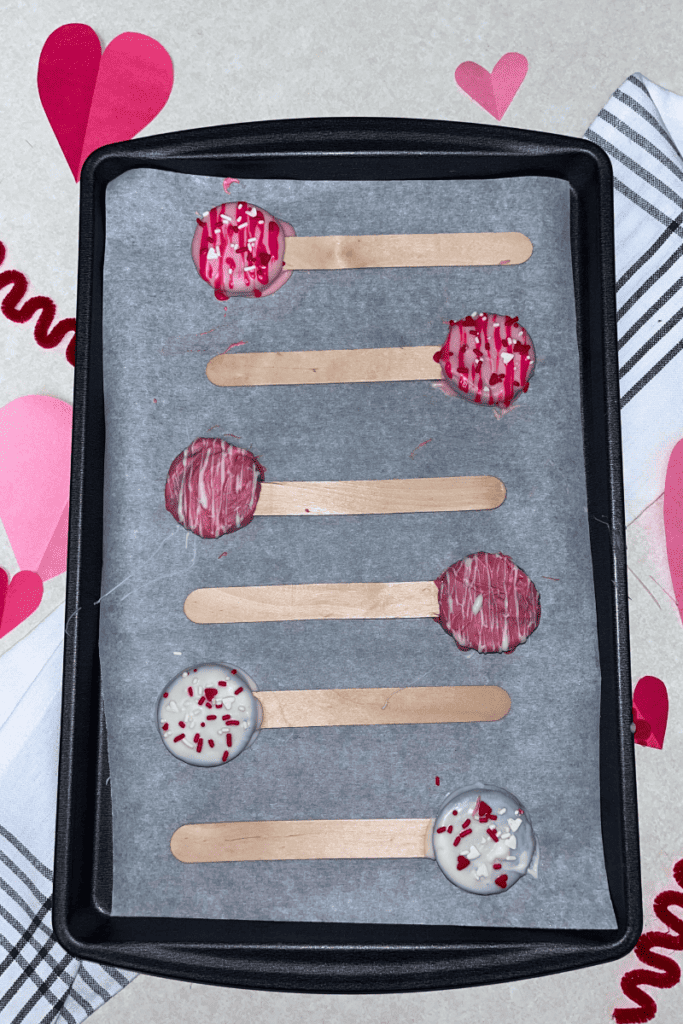
~ Step 4: Decorate Oreo Pops
For this step, work quickly! It is best to add any sprinkles before the outer chocolate shell hardens around the Oreo pops. That way, the sprinkles will stay on. Any drizzle you want to add can come later. To create the drizzle effect, use freshly warmed chocolate and a spoon while moving your hand in a back-and-forth motion.
Also, if you had any extra chocolate that ran off onto the sides, you can break it off for a more clean, round looking Oreo pop. I have definitely used this trick to make my pops look neat!
~Step 5: Refrigerate and Serve
Once you are done decorating the Oreo pops, refirgerate them for 5-10 minutes. This will help ensure that all of the chocolate coating hardens.
Then, serve your Oreo pops with a glas of milk and enjoy!

Making a Stand for the Oreo Pops
With a small piece of styrofoam, you can easily make a stand for your Oreo pops like the one in the photo below. This means that your Oreo pops can double as both a dessert and a decoration! If you are bringing your Oreo pops to a gathering or even plan on having them for a few days, I reccomend making a cute display stand like this!
How to make it:
Simply cut a piece of styrofoam the size you want to use. Mine was about 3 inches tall, 2 inches thick, and 12 inches across. This was a good size to hold 5-8 pops.
Then, take an unused popsicle stick to poke holes for each of your Oreo pops to fit inside. You don’t want to use an already made Oreo pop for this step, because you will likely break it.
Once you have a hole made for each of the pops, decorate the cake pop stand and fill it with your treats!!


Valentine’s Day Oreo Pops
Equipment
- 2-3 Small Bowls
- 1 roll parchment paper
- 1 Spoon
- 1 microwave
- 1 Baking Sheet
Ingredients
- 6-8 Oreo cookies
- Baker's Chocolate
- 1 package V-day Sprinkles
- 1 bottle Red Food Dye
Instructions
- Add parchment paper to a baking sheet.
- Insert a popsicle stick into each Oreo and line the baking sheet with them.
- Carefully melt your baker's chocolate, following the instructions on the package.
- Add red food coloring to your melted chocolate and mix it together.
- Coat Oreo pops in the melted chocolate and place them on the baking sheet.
- Decorate Valentine's Day Oreo pops with pink chocolate drizzles, heart sprinkles, and more.
- Allow chocolate and decorations to set.
- Serve your Valentine's Day Oreo pops and enjoy!
Making an Oreo Pop Stand
- Cut a piece of styrofoam to your liking. I reccomend 12 inches long, 3 inches high, and 2 inches wide.
- Use a popsicle stick to create holes for the Oreo pops.
- Decorate styrofoam stand as desired. (Paint, stickers, paper hearts, etc.)
- Add in the completed Oreo pops.
More Valentine’s Day Inspiration
We have everything from Valentine’s Day-themed recipes to decorations, activities, and more. Everything you need to go all out for this special day!
- Simple and Fun Valentine’s Day Crafts
- DIY Valentine’s Day Decor Ideas
- Valentine’s Day Bingo (Free Printable)
- Valentine’s Day Punch Board Game
- Valentine’s Day Love Coupons
- Valentine’s Day Party Activities
Don’t Leave Just Yet
Here at Events to Celebrate, my whole goal is to help real people plan for their kids’ birthday parties, life events, and holidays! Life is crazy. I GET IT. You don’t have endless time OR money to spend on parties, but you still want to help your guests have a great time. I’m here to help give you tips, tricks, and ideas for celebrating life on a budget.
As a mom, you want to do it all. You want to make your family happy and create special memories. My brand is all about creating special moments with those you love. The kind of moments that you will look back on years later and wish you could relive! So, if that’s something you’re interested in, stick around! I have an email list you can sign up for, so you don’t miss my future party ideas!
