
4 Ingredient Red Velvet Cake Balls
This post may contain affiliate links, including Amazon Associate links. As an Amazon Associate, I earn from qualifying purchases at no additional cost to you. Please see my Disclosure Policy for more details.


With cake, cream cheese, frosting, and chocolate, you can easily make these delicious red velvet cake balls! Perfect for any holiday or party!
Whether you are a pro baker or a beginner, these red velvet cake balls are a must-have in your cookbook! Since you really only 4 ingredients to make them, they are a super fun, customizable treat to enjoy yourself and share with others!
In this article, I have included step-by-step instructions, pictures, and answers to frequently asked questions. These additions will help make the process smooth and successful!

Why you will LOVE these Red Velvet Cake Balls
If you are on this page, I think it is safe to say that you like treats. (ME TOO!)
In fact, I love treats so much, that I hate having to choose just one. You know the scenario. You’re at a party and there is a whole TABLE lined with treats. How could you ever choose just one?!
These cake balls are the perfect mini dessert for situations like that. You can experience the rich, moist flavor of red velvet cake all packaged up in a hard chocolate shell that makes for the most satisfying bite!! You’re not committing to a whole slice of cake. Just a cake ball!
But let’s be honest. You will probably have more. Truth be told, I can never eat just one of these. And neither can anyone else. Every party I have taken these too, they were gobbled up!
I could go on and on about these, but let me tell you just one more reason you will like this recipe.
These red velvet cake balls are fun to make! Sure it would be a little messy, but you could have your kiddos join you in the kitchen! Or a friend. Growing up, my sister and I would make cake pops or Oreo balls every Christmas! So it doesn’t have to just be a recipe or a dessert. It can be a memory too!
Cake Ball FAQ’s
- Can I use this recipe to make red velvet cake pops?
Yes, you can! The only difference would be adding the cake pop sticks. If you choose to make these cake balls into cake pops, I suggest adding the sticks right after you roll the cake mixture into spheres. Then when you freeze them, the cake will harden around the stick.
- How do you keep cake balls from falling apart?
The frosting in this recipe acts as a glue to hold the mixture together. If your cake mixture is too dry, it will likely be crumbly. Try adding moisture to help bind the ingredients. Possibly add more frosting or a small amount of water (1 Tbsp at a time). Another thing that can help is freezing them. This step is particularly helpful before covering the cake balls in melted chocolate.
- What is the secret to dipping cake balls?
Freeze your cake balls beforehand, use freshly melted chocolate, and work fast! The longer the cake balls sit out, the softer they get and the thicker your melted chocolate gets. If needed, throw the cake balls back into the freezer to reharden or re-melt the chocolate.
- How long can cake balls sit out?
Because these cake balls have cream cheese mixed into them, they can be left out for 2-3 hours, but should be refrigerated when not being served. Refrigerate for up to 2 weeks in an airtight container in the fridge or 3 months in the freezer.

How to make these Red Velvet Cake Balls
What you will need
- Red Velvet Cake – If you already have pre-made red velvet cake, great! You could skip the first few steps of this tutorial. If not, you have two options. You could make your red velvet cake from scratch or use a box mix. For those who want to make the cake mix themselves, Sally’s Baking Addiction has a great recipe you could follow. But for the sake of convenience and time, I chose a red velvet box cake mix from Duncan Hines. With that, I needed the required 3 eggs, 1 cup water, and ½ cup oil to make the mix!
- Pre-made Frosting – Generally red velvet cake is served with a cream cheese frosting. So, if you want that rich, creamy flavor, you could buy cream cheese frosting, make your own, or use my recipe! (1 can regular frosting + 1 block of cream cheese!)
- 1 Block cream cheese/Nuefchatel cheese (1/3 fat) – You could use full-fat cream cheese or ⅓ fat. It doesn’t change the flavor very much, so I opted for the lower-fat option.
- Bakers Chocolate/Bark – You could use any kind of chocolate for this (dark chocolate, milk chocolate, white chocolate, or even colored candy melts). I used the baker’s chocolate that comes in the huge blocks since it melts easily.
- Optional: Sprinkles – You definitely don’t have to add sprinkles. However, I suggest either adding sprinkles or additional chocolate to the top of the cake balls. Cake balls can get a little messy with the melted chocolate and sprinkles are an easy way to cover up imperfections or add additional decoration.

Kitchenware
- 1 mixing bowl
- 1 sheet pan
- 1 9×13 pan
- 1 roll of parchment paper
- 1 stand/ hand mixer
- 1 spatula
- 1 spoon
- Cooking spray
- 2-3 small bowls
Instructions
Start by gathering all of your ingredients and preheating your oven to 350 degrees Fahrenheit. Spray your cake pan. Next, mix together your red velvet cake mix, eggs, water, and oil.
Once the red velvet cake batter is fully combined, pour the mixture into your cake pan.

Bake your red velvet cake according to the instructions on the back of the box. Mine cooked for about 25-30 minutes.
To check if your cake is ready, try inserting a toothpick or fork into the middle. If it comes out clean, your cake is ready to be removed from the oven.
Pull your cake from the oven and let it cool down for 10-15 minutes.

After the cake has cooled, use a fork to break apart the entire cake. This step takes about 5 minutes.
The more you crumble the cake, the smoother your red velvet cake ball mixture will be.

After crumbling the cake, you are ready to make this 2-ingredient frosting! Simply combine your block of cream cheese and a can of pre-made frosting.
With a hand mixer, combine the 2 ingredients until you have a smooth, creamy frosting.

Take your frosting mixture and add it to the red velvet cake crumbles.
Using a spatula (or clean hands), fully incorporate the frosting into the cake crumbles. This should leave you with a soft, bright red mixture that is moist and malleable.

Next, scoop out spoonfuls of the red velvet cake mixture and roll them into balls. Make them 1 1/2 inches in diameter. Place these balls on a baking sheet lined with parchment paper.
I’ve found that it can be easier to shape the balls if your hands are a little damp. Try running your hands under water or giving them a quick spritz with cooking spray to prevent sticking.

Once all the balls have been rolled out, freeze them for 20 minutes or until hard.
The harder they are, the easier they will be to coat in chocolate.

Then, remove your cake balls from the freezer.
Melt your baker’s chocolate in 30-second increments, stirring frequently. You don’t have to do it all at once, but melt a decent amount, since you will have a lot of red velvet cake balls to cover. Make sure not to let your chocolate overheat!
Everyone has their own strategy for coating the balls in chocolate, but I like to use a toothpick to hold the ball in one hand and use the other to scoop melted chocolate onto the entire surface of the ball.
Try to let any excess melted chocolate run off and then place the cake ball back onto the parchment paper.
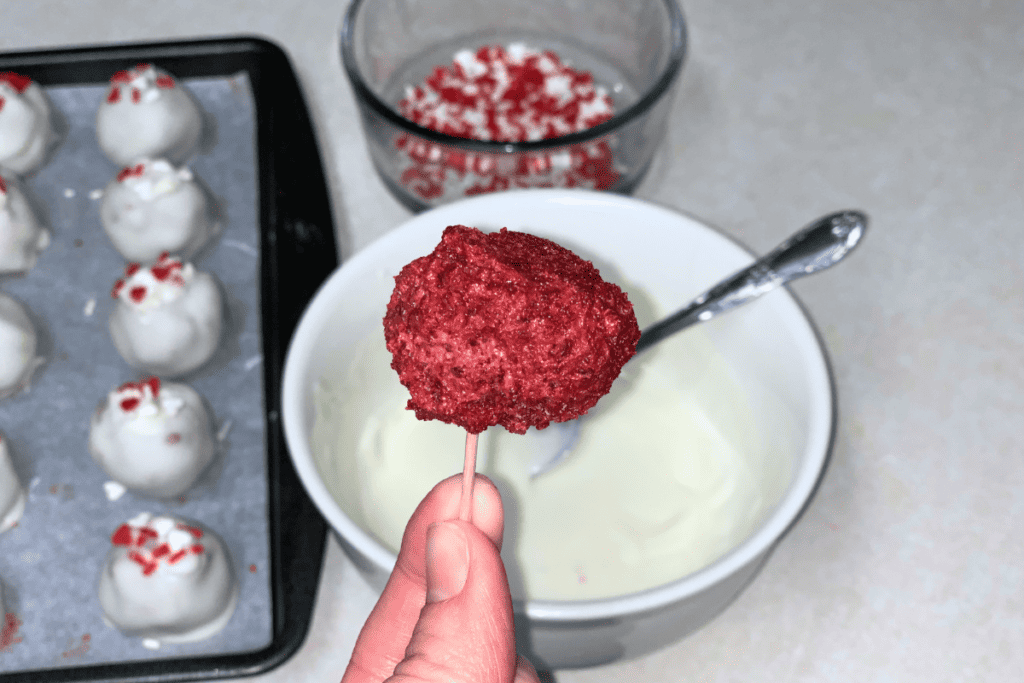
If you want to add sprinkles to your cake balls, add them on while the chocolate is still wet.
Don’t stress though if it has already hardened. You can add a little dollop of fresh chocolate to the top and then quickly add sprinkles.
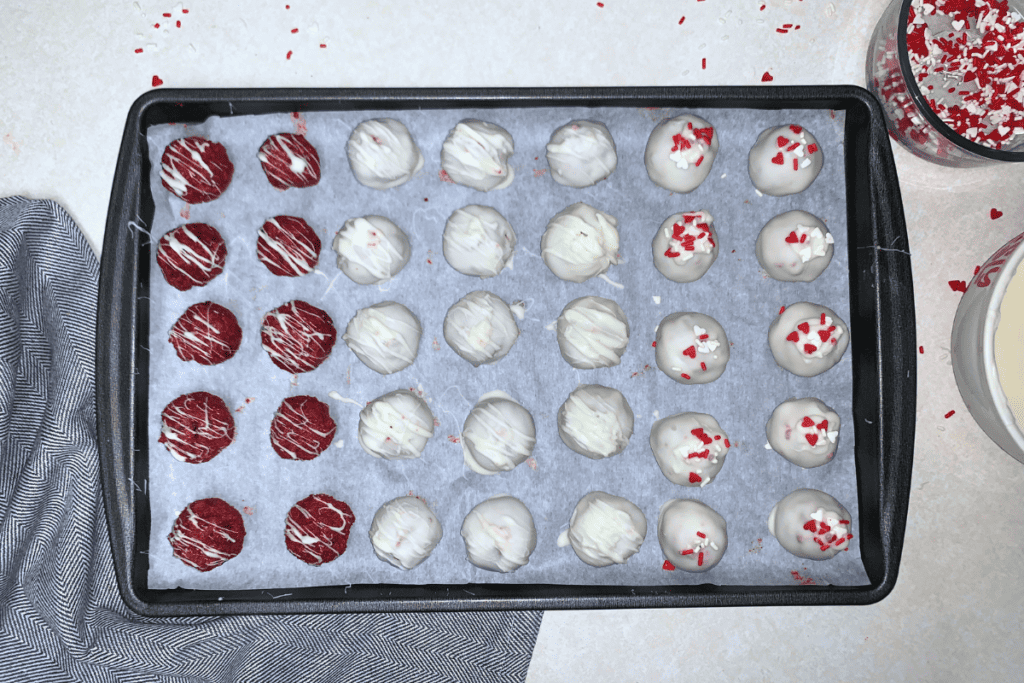
Another decorating option is to add a drizzle to the top. Below you can see three different decorating styles: bare cake ball with slight drizzle, covered cake ball with a drizzle, and covered cake ball with sprinkles!
When you are done decorating, your red velvet cake balls are ready to serve and enjoy!!
If you don’t plan on serving them immediately, I suggest throwing them in the fridge. This helps them stay fresh and delicious.
Happy eating 🙂


Red Velvet Cake Balls
Equipment
- 1 Mixing bowl
- 1 hand mixer/stand mixer
- 1 Spatula
- 1 cake pan
- 1 roll parchment paper
- 1 Baking Sheet
- 2-3 Small Bowls
- 1 can of cooking spray
Ingredients
Red Velvet Cake
- 1 box red velvet cake mix
- 3 eggs
- 1 cup water
- 1/2 cup vegetable oil
Frosting
- 1 can pre-made frosting
- 1 block cream cheese
Decorating
- 24 oz baker's chocolate
- 1 container sprinkles optional
Instructions
- Gather all of your ingredients.
- Preheat oven, spray cake pan, and prepare red velvet cake mix according to box instructions. (Combine cake mix, eggs, water, and oil).
- Pour the mixture into your cake pan and bake red velvet cake according to the instructions on the back of the box.
- Let the cake cool down for 10-15 minutes.
- Use a fork to break apart the entire cake.
- Prepare your frosting by combining a block of cream cheese and a can of pre-made frosting. Mix until smooth and creamy.
- Add frosting to the red velvet cake crumbles. Using a spatula (or clean hands), fully incorporate the frosting into the cake crumbles.
- Roll mixture into cake balls and place on a baking sheet lined with parchment paper.
- Freeze cake balls.
- Melt your baker’s chocolate in 30-second increments, stirring frequently.
- Coat cake balls in melted chocolate.
- Decorate cake balls as desired. (optional sprinkles or additional chocolate)
- Refrigerate red velvet cake balls until you are ready to serve!
Notes
- Wet hands with water or oil before rolling the cake mixture into balls
- Freeze cake balls until hardened before coating them in chocolate
- Store completed cake balls in an airtight container in the fridge for 2 weeks or freezer for up to 3 months.
- DO NOT overheat your chocolate. If the chocolate gets burned in the microwave, it will be unusable. Prevent this by warming it in 30 second increments and stirring frequently.
Celebration Ideas
This recipe is a great one to pull out for any holiday. Just imagine all the possibilities!
Valentine’s Day would be an absolute show-stopper with these red velvet cake balls and our pink Oreo pops. With our help, you could throw an incredible party with cute DIY Valentine’s Day decorations, tons of fun crafts, and of course, these delicious treats.
or bake them for a festive 4th of July! Since these cake balls are red and white, they would be a great addition to any Independence Day picnic. You could enjoy them while playing July 4th trivia, watching fireworks, singing the national anthem, or even making these adorable popsicle stick stars.
In fact, you could even make this holiday dessert for Christmas! These would be a fun snack to have while watching a Christmas movie, decorating for the holidays, playing fun Christmas games, or even as a tasty Christmas party favor!
These red velvet cake pops are ready to come out any time you want to celebrate!
Other Delicious Treats
Save these mouth-watering confections for the next time you have a sugar craving!
- Valentine’s Day Oreo Pops
- Holiday Cinnamon Almonds
- Crisco Chocolate Chip Cookies
- 3 Ingredient Peppermint Fudge
- Easy Oreo Ball Recipe
Don’t Leave Just Yet
Here at Events to Celebrate, my whole goal is to help real people plan for their kids’ birthday parties, life events, and holidays! Life is crazy. I GET IT. You don’t have endless time OR money to spend on parties, but you still want to help your guests have a great time. I’m here to help give you tips, tricks, and ideas for celebrating life on a budget.
As a mom, you want to do it all. You want to make your family happy and create special memories. My brand is all about creating special moments with those you love. The kind of moments that you will look back on years later and wish you could relive! So, if that’s something you’re interested in, stick around! I have an email list you can sign up for, so you don’t miss my future party ideas!
